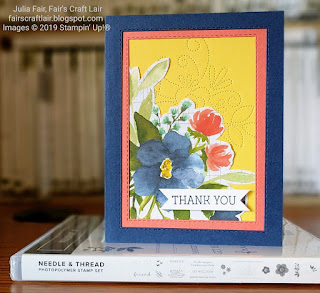
Stitched Thank You Card Tutorial
Stampin' Up! came out with a Floral Grid Paper in the last 6 months, and I just love the images on it. In fact, I love it so much that in needs to be used on a project or two! I paired the paper with the Needle and Thread Bundle, which has great floral images and stitching, which also coordinate with the Stitched Rectangles that I used to create the framed look for this card.
Product of the Week: 18'-20' In Color Designer Series Paper
The 18'-20' In Color DSP is bright and bold with stripes and dots, making perfect backgrounds for most any project. It comes with all 5 In Colors with two, double-sided designs in either color with white, or tone-on-tone color.
Stitched Thank You Card Tutorial
Needle and Thread Stamp Set
Base: Night of Navy Cardstock, 8 1/2" x 5 1/2", score and fold at 4 1/4", die cut one side with 2nd largest rectangle from the Stitched Rectangle Dies
Layer 1: Calypso Coral Cardstock, 5 3/8" x 4 1/8", die cut with 3rd largest rectangle in Stitched Rectangle Dies
Layer 2: Daffodil Delight Cardstock, 5 3/8" x 4 1/8", use the stitched floral design in the Needlepoint Elements Framelits Dies on the top center (run through Big Shot)
Layer 3: Floral Grid Paper, cut out the small corner by hand
Layer 4: Whisper White Cardstock, 2 1/4" x 1/2"
Inside Panel: Whisper White Cardstock,
5 1/4" x 4"
Instructions:
1. Adhere Layer 3 to Layer 2 using Snail. Adhere in the bottom-left corner.
2. Adhere Layer 1 over the top of Layer 2 and 3 using Snail.
3. Adhere the window frame of the Base over Layers 1, 2, and 3 using Multi Liquid Glue.
4. Adhere Inside Panel to the inside back of the Base using Snail.
5. Stamp "Thank You" sentiment onto Layer 4 using Night of Navy Ink. Banner cut the ends of Layer 4 and adhere to the bottom-right of Layer 3 using Dimensionals.
Supplies for Today's Tutorial:
Click on the images to shop with me!


No comments:
Post a Comment