Step-It-Up Card Tutorial


The other category we have is "Avid," which is the "I want it all" category in my perspective. Designs in this category will be lots of layers, use many products, or generally use some sort of advanced skill.
I hope you can see the differences between the three designs I'm sharing today. All three designs use the Blender Pen, which is a great way to tint the leaves. Simply stamp your image and use the Blender Pen to pull the color from the ink stamped to fill the image.
Thankful Thursday
Spring is just around the corner and our new yard is showing signs of life. My favorite is a weed that has these beautiful little purple flowers: Creeping Charlie. I know, I know...weeds are something most people don't want, but I can't help admiring how beautiful the little flowers are (I also enjoy dandelions). I'm thankful for the renewal of our seasons, and that we have such beauty in our natural world.
Product of the Week: Just Because Host Stamp Set


The Just Because Cling Stamp Set features three medium size floral images that are perfect for both full-size cards and note cards. Each image also has a sentiment built in so you don't have to arrange your stamps to line everything up. It's already lined up for you! It also comes with two additional sentiments in case you have some other occasions to make cards for. You can either cover up the sentiments on the image stamps, or you can cut the sentiments off from the images so you can stamp everything individually.
Calling All Hosts/Hostesses!
How would you like to earn Stampin' Up! products for FREE? I'm looking for hosts to hold private workshops and classes and now is the best time EVER. Sale-a-Bration is in full swing, and that means more host rewards for YOU with qualified sales. How much more? We are talking about DOUBLE the rewards! I'm happy to hold parties for you at my home (although I'm in Yanceyville, but have a really cool house), or we can find a location local to your home if you would rather hold your party or workshop somewhere other than a home. And online parties and events are always fun! And, I have special thank you's for my hosts on top of all the rewards Stampin' Up! has too!
Step-It-Up Card Tutorial
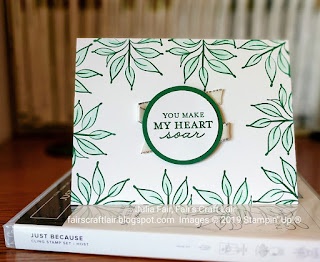
Just Because Stamp SetBeginner Card:
Base: Whisper White Thick Cardstock,
8 1/2" x 5 1/2", score and fold at 4 1/4"
1. Stamp "You Make My Heart..." sentiment in the middle of the Base using Shaded Spruce Ink.
2. Stamp large leaf image around the edges of the card front using Shaded Spruce Ink. Be sure to ink most of the stamp, including the pot, but stamp so the leaves are on the card. Also be sure to put a scrap paper underneath because the pot will stamp on whatever is under your card.
3. Use Blender Pen to pull some of the ink into the leaves.
 Casual Card:
Base: Whisper White Thick Cardstock,
8 1/2" x 5 1/2", score and fold at 4 1/4"
Layer 1: Shaded Spruce Cardstock, punch with
2" Circle Punch
Layer 2: Whisper White Cardstock, punch with
1 3/4" Circle Punch
Embellishment: Silver 3/8" Metallic-Edge Ribbon
1. Stamp "You Make My Heart..." sentiment onto Layer 2 using Shaded Spruce Ink.
2. Stamp large leaf image around the edges of the card front using Shaded Spruce Ink. Be sure to ink most of the stamp, including the pot, but stamp so the leaves are on the card. Also be sure to put a scrap paper underneath because the pot will stamp on whatever is under your card.
3. Use Blender Pen to pull some of the ink into the leaves.
4. Adhere Layer 2 to Layer 1.
5. Adhere about 6" of Metallic-Edge Ribbon in center of Base using Mini Glue Dots. Fold it twice, so there are three sections of the ribbon.
6. Adhere Layers 1 and 2 on top of the Metallic-Edge Ribbon using Dimensionals.
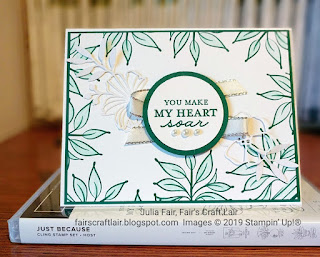 Avid Card:
Base: Whisper White Thick Cardstock,
8 1/2" x 5 1/2", score and fold at 4 1/4"
Layer 1: Shaded Spruce Cardstock, 5 3/8" x 4 1/8"
Layer 2: Whisper White Cardstock, 5 1/4" x 4"
Layer 3: Delightfully Detailed Laser-Cut Specialty Paper, two small floral pieces.
Layer 4: Shaded Spruce Cardstock, punch with
2" Circle Punch
Layer 5: Whisper White Cardstock, punch with
1 3/4" Circle Punch
Embellishment: Silver 3/8" Metallic-Edge Ribbon, Pearl Basic Jewels
1. Stamp "You Make My Heart..." sentiment onto Layer 4 using Shaded Spruce Ink.
2. Stamp large leaf image around the edges of Layer 2 using Shaded Spruce Ink. Be sure to ink most of the stamp, including the pot, but stamp so only leaves are on the card. Also be sure to put a scrap paper underneath because the pot will stamp on whatever is under your card.
3. Use Blender Pen to pull some of the ink into the leaves on Layer 2.
4. Adhere Layer 2 to Layer 1, then adhere both to Base.
5. Cut out two small floral pieces from the Delightfully Detailed Laser-Cut Specialty Paper
(~1" x 2"), adhere both to center of Layer 2 using Mini Glue Dots with both on the diagonal going from top-left to bottom-right.
6. Adhere about 6" of Metallic-Edge Ribbon in center of Layer 2 using Mini Glue Dots. Fold it twice, so there are three sections of the ribbon.
7. Adhere Layers 4 and 5 together. Then adhere both on top of the Metallic-Edge Ribbon using Dimensionals.
8 1/2" x 5 1/2", score and fold at 4 1/4"
1. Stamp "You Make My Heart..." sentiment in the middle of the Base using Shaded Spruce Ink.
2. Stamp large leaf image around the edges of the card front using Shaded Spruce Ink. Be sure to ink most of the stamp, including the pot, but stamp so the leaves are on the card. Also be sure to put a scrap paper underneath because the pot will stamp on whatever is under your card.
3. Use Blender Pen to pull some of the ink into the leaves.
Casual Card:Base: Whisper White Thick Cardstock,
8 1/2" x 5 1/2", score and fold at 4 1/4"
Layer 1: Shaded Spruce Cardstock, punch with
2" Circle Punch
Layer 2: Whisper White Cardstock, punch with
1 3/4" Circle Punch
Embellishment: Silver 3/8" Metallic-Edge Ribbon
1. Stamp "You Make My Heart..." sentiment onto Layer 2 using Shaded Spruce Ink.
2. Stamp large leaf image around the edges of the card front using Shaded Spruce Ink. Be sure to ink most of the stamp, including the pot, but stamp so the leaves are on the card. Also be sure to put a scrap paper underneath because the pot will stamp on whatever is under your card.
3. Use Blender Pen to pull some of the ink into the leaves.
4. Adhere Layer 2 to Layer 1.
5. Adhere about 6" of Metallic-Edge Ribbon in center of Base using Mini Glue Dots. Fold it twice, so there are three sections of the ribbon.
6. Adhere Layers 1 and 2 on top of the Metallic-Edge Ribbon using Dimensionals.
Avid Card:Base: Whisper White Thick Cardstock,
8 1/2" x 5 1/2", score and fold at 4 1/4"
Layer 1: Shaded Spruce Cardstock, 5 3/8" x 4 1/8"
Layer 2: Whisper White Cardstock, 5 1/4" x 4"
Layer 3: Delightfully Detailed Laser-Cut Specialty Paper, two small floral pieces.
Layer 4: Shaded Spruce Cardstock, punch with
2" Circle Punch
Layer 5: Whisper White Cardstock, punch with
1 3/4" Circle Punch
Embellishment: Silver 3/8" Metallic-Edge Ribbon, Pearl Basic Jewels
1. Stamp "You Make My Heart..." sentiment onto Layer 4 using Shaded Spruce Ink.
2. Stamp large leaf image around the edges of Layer 2 using Shaded Spruce Ink. Be sure to ink most of the stamp, including the pot, but stamp so only leaves are on the card. Also be sure to put a scrap paper underneath because the pot will stamp on whatever is under your card.
3. Use Blender Pen to pull some of the ink into the leaves on Layer 2.
4. Adhere Layer 2 to Layer 1, then adhere both to Base.
5. Cut out two small floral pieces from the Delightfully Detailed Laser-Cut Specialty Paper
(~1" x 2"), adhere both to center of Layer 2 using Mini Glue Dots with both on the diagonal going from top-left to bottom-right.
6. Adhere about 6" of Metallic-Edge Ribbon in center of Layer 2 using Mini Glue Dots. Fold it twice, so there are three sections of the ribbon.
7. Adhere Layers 4 and 5 together. Then adhere both on top of the Metallic-Edge Ribbon using Dimensionals.
8. Add three Pearl Basic Jewels under the sentiment on Layer 5.
Supplies for today's tutorial:


No comments:
Post a Comment