Thanks a Lattice Card Tutorial
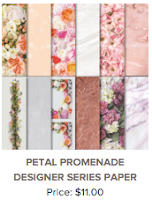
This Lovely Lattice Cling Stamp Set has sparked some advanced coloring techniques with me this week, so hold on to your reigns, I have some fun videos coming for you this week! But before we get into some more specialized techniques, basics first. Our Make It Monday tutorial features the Petal Promenade Designer Series Paper, on which the large lattice is stamped directly on top. The subtle bokeh background is a perfect way to add texture and color to the stamped image. The "Thank You" sentiment is borrowed from the Love What You Do Stamp Set, but this stamp set will pair with many wonderful sentiments. So picks out your favorites and share in some stamping fun!
Product of the Week
The Lovely Lattice Cling Stamp Set is perfect for designing quick and easy cards. It features this bold, beautiful floral design on top of a lattice doily, a perfect centerpiece for many different kinds of cards. Simply pair it with your choice of sentiment and you can create cards for any occasion. It comes with 3 images, including the large lattice, a small floral and a border image. You can stamp the images on solid paper, or stamp them on Whisper White and use your choice of coloring technique to add your own special flair!
Calling All Hosts/Hostesses!
How would you like to earn Stampin' Up! products for FREE? I'm looking for hosts to hold private workshops and classes and now is the best time EVER. Sale-a-Bration is in full swing, and that means more host rewards for YOU with qualified sales. How much more? We are talking about DOUBLE the rewards! I'm happy to hold parties for you at my home (although I'm in Yanceyville, but have a really cool house), or we can find a location local to your home if you would rather hold your party or workshop somewhere other than a home. And online parties and events are always fun! And, I have special thank you's for my hosts on top of all the rewards Stampin' Up! has too!
Thanks a Lattice Card Tutorial
Lovely Lattice Stamp Set/Love What You Do Stamp Set
Base: Petal Pink Card Stock, 8 1/2" x 5 1/2", score at fold at 4 1/4"
Layer 1: Basic Black Card Stock,
3 1/2" x 4"
Layer 2: Whisper White Card Stock,
3 3/8" x 3 7/8"
Layer 3: Petal Promenade Designer Series Paper, 3 1/2" x 4" (will trim to 3 1/4" x 3 3/4" after stamping)
Embellishment: Faceted Dots: Black
Instructions:
1. Stamp "Thank You" from Share What You Love Stamp Set on bottom-right corner of Base using Tuxedo Black Memento Ink.
2. Stamp large lattice design from Lovely Lattice Cling Stamp Set on Layer 3 using Tuxedo Black Memento Ink.
3. Adhere Layers 1, 2 and 3 together, then adhere to the Base.
4. Adhere 3 Faceted Dots in Black on the left side under Layer 1.
Supplies for today's tutorial:


No comments:
Post a Comment