Monday, August 27, 2018

Garden Impressions Card Tutorial and Product of the Week

Garden Impressions - Kindness Changes Everything Card Tutorial


I feel the end of summer is near.  Members of my household and friends are desperate for fall to arrive, and are finding every excuse to bring out fall decor and shop for fall fragrances and clothing.  I personally wish summer would last a bit longer, not because of the heat!  I love the blooms, sitting outside in the evenings for meals, and the long days.  Lucky for me, Stampin' Up has so many summery products in the Annual Catalog.  So for the last week before the Holiday Catalog comes out, I'm going to enjoy one more week of summer with Garden Impressions.

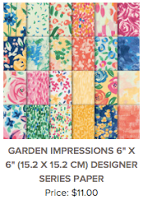
This product suite is amazing.  So many things can be used alone or together.  The thinlits dies have bold and beautiful shapes that stand on their own.  The stamp set can build focal points, has different size sentiments, and can create your own Designer Series Paper (DSP).  Speaking of DSP, this one is vibrant with floral images and Van Gogh-like textures.  It is certain to make any of your projects look like a masterpiece.

Product of the Week: Garden Impressions DSP (you could have guessed it).
Since this week focuses on the Garden Impressions Suite, I'm changing up my offer.  With any $50 order, you can choose your paper sampler:  Garden Impressions or Twinkle Twinkle (from last week).  More choices means more fun!  You just need to let me know which paper you'd prefer to have a sample of and I'll ship it right to your door.

Bonus Days too?  Yes!  Stampin' Up is having Bonus Days through the end of August.  For every $50 you spend, they will send you a $5 coupon code to spend on any order during the month of September.  Free DSP sampler and a $5 reward?  Yes!  


Garden Impressions - Kindness Changes Everything Card Tutorial

Base:  So Saffron Card Stock, 8 1/2" x 5 1/2" folded at 4 1/4" oriented in landscape
Layer 1: Calypso Coral Card Stock 5 1/4" x 4"
Layer 2: So Saffron Card Stock 4" x 2 1/2"
Layer 3: Garden Impressions DSP, 4" x 2 1/4"
Layer 4: So Saffron Card Stock, cut with largest scallop oval die in Layering Ovals Framelits (3 5/8" x 2 5/8")
Layer 5: Calypso Coral Card Stock, cut with 2nd largest regular oval in Layering Ovals (3 3/8" x 2 3/8")
Layer 6: Whisper White Card Stock, cut with 3rd largest regular oval in Layering Ovals (3 1/8" x 2 1/8")

Instructions

1.  Stamp "Kindness Changes Everything" sentiment using Shaded Spruce on Layer 6.  Adhere to Layers 5 and 4.

2.  Emboss Layer 1 with Petal Pair Embossing Folders across short side of card stock: floral on one end and the vines on the other.  Adhere to Base with floral on right side.

3.  Adhere Layer 2 and 3 together.  Adhere to Base with about 3/4" of Calypso Coral showing on the left side.  Adhere oval layers over Layers 2 and 3 towards bottom using Dimensionals.


4.  Cut out two leaves and a small flower from the Delightfully Detailed DSP.  Use Sponge Daubers to ink the leaves in Shaded Spruce and the flower in Pacific Point.  Put Snail adhesive on the back of the flower and adhere the leaves to the flower.  Add more adhesive to the back of the flower and place on the right side of the Whisper White oval.

Kindness Changes Everything Card Supply List
Click on the images below to shop for each product in my store!


Sunday, August 26, 2018

Tea Room Tutorial - You Fill My Cup with Happiness

Tea Room Tutorial - You Fill My Cup with Happiness


For Sunday, I thought a simpler design using the lovely Team Room Bundle would be excellent.  I am sticking with the colors from the Designer Series Paper (DSP) in case you'd like to update any of these designs with the DSP.  Although the layout is more simple, the stamping is a bit more involved, using three colors of ink.  Layers of trim and ribbon also add texture and interest.  Hope you enjoy the tutorial below.  And as always, you can purchase any of the supplies on my Stampin' Up Demonstrator Website (store) by clicking the product images in the supply list.

Happy Stamping!

For Classes and Workshops click HERE!!!!

Julia Sharpe Fair
cre8ivestampers@gmail.com
Fair's Craft Lair on Facebook
juliafair.stampinup.net


   You Fill My Cup With Happiness Card Tutorial
Tea Room Product Suite

Base:  Very Vanilla Thick Card Stock, 8 1/2" x 5 1/2" folded at 4 1/4", landscape style
Layer 1: Calypso Coral Card Stock 5 1/4" x 4", emboss with Petal Pair Embossing Folder with lines.
Layer 2: Very Vanilla Card Stock 3 1/4" x 2 3/4"
Layer 3: Very Vanilla Lace Trip and Tea Room Ribbon, Copper Metallic Thread
Layer 4: Very Vanilla Card Stock, 3" x 1 1/2"


Instructions

1.  Stamp Tea Cup image using Calypso Coral Ink on Layer 4.  Add Wink of Stella to details on the cup.

2.  Cut bottom edge of Layer 2 with Scallop Edgelit in die set.  Stamp outline leaf pattern 2 times filling bottom on Layer 3 using Pear Pizzazz Ink.  Stamp "You Fill..." sentiment towards top of Layer 3 in Old Olive Ink (leave about 1/4" at top).

3.  On Layer 2, put a small amount of Snail in the middle of the leaves at bottom.  Wrap Copper Metallic Thread around 4 fingers on one hand about 5 times, and tack to the Snail on leaves.  Using Dimensionals, adhere Layer 4 on top of leave and Copper Thread on Layer 2.

4.  Using Snail, adhere Layer 2 to Layer 1 on right bottom side.  Adhere Layer 3 across card width using Glue Dots on back to secure.  Lace and ribbon should cover top edge of Layer 2.  Tie a Lace Trip knot at top left corner of Layer 2, and add a ribbon bow over the top of the knot, securing with Glue Dots.

5.  Adhere assembled Layer 1 to Base.


   You Fill My Cup With Happiness Card Supply List
Click on each product to view/purchase in my store.


Saturday, August 25, 2018

Tea Room Product Suite - Sophisticated Saturday


   Tea Room Product Suite - Sophisticated Saturday

For Upcoming Classes and Workshops, Click HERE!!!

   From Me to You Card Tutorial


The Tea Room Suite is one I haven't had much time to play with.  But with the weather so beautiful, it seemed appropriate for a Saturday morning to share a tutorial.  The stamp set includes a few 2-step stamps, where you can stamp the outline and then stamp a filler.  The outline images are great to use on their own as well, which makes this so versatile.  I hope you enjoy this tutorial and please visit my store or email me if you'd like any help or would like to purchase supplies to make this project.

Julia Sharpe Fair
cre8ivestampers@gmail.com
Fair's Craft Lair on Facebook
juliafair.stampinup.net


   From Me to You Card Tutorial
Tea Room Product Suite

Base:  Very Vanilla Thick Card Stock, 8 1/2" x 5 1/2" folded at 4 1/4"
Layer 1: Coastal Cabana Card Stock 5 1/8" x 3 5/8"
Layer 2: Very Vanilla Card Stock 4 7/8" x 3 3/8"
Layer 3: Very Vanilla Lace and Tea Room Ribbon
Layer 4: Coastal Cabana Card Stock, cut with largest circular die in Spot of Tea Framelits
Layer 5: Pear Pizzazz Card Stock, 2" circle from 2" Circle Punch
Layer 6: Very Vanilla Card Stock, cut with smallest circular die in Spot of Tea Framelits

Instructions

1.  Stamp "From Me to You" sentiment using Old Olive Ink on Layer 6.  Adhere to Layers 5 and 4.

2.  Stamp outline leaf pattern on Layer 3 using Old Olive Ink, leaving about an inch of Very Vanilla running the length of the card unstamped.  Use coordinating filler stamp to fill the inside of each leaf stamp using Pear Pizzazz Ink.

3.  Adhere Layer 1 and 2 together.  Wrap Layer 3 around Layer 1 and 2 on the edge of the leaf stamping lengthwise, adhering to the back with Mini Glue Dots.  Adhere to card Base.

4.  Using Dimensionals, adhere Layers 4, 5, and 6 to Card Base over Tea Room and Lace Ribbon about an inch from bottom of Layer 2.  Embellish with a Tea Room bow under sentiment.


   From Me to You Card Supply List
Click on each product to view/purchase in my store.