Monday, January 28, 2019

Make-It Monday with Forever Lovely

 Lovely Wishes Card Tutorial
Starting off the week with a bold image from the All My Love Designer Series Paper (DSP).  This DSP coordinates with the Forever Lovely Bundle AND the Meant To Be Bundle as well, creating a double product suite.  DSPs make it easy to design beautiful cards because they provide great texture and designs.  One of the easiest to do is to use one layer of DSP on top of your card base just a 1/4" smaller on both sides.  So if your card front measures 5 1/2" x 4 1/4", your layer of DSP would be 5 1/4" x 4".  The base will create a frame around your DSP, so be sure to pick a color for your card base that shows off your DSP!  Full tutorial is below to help you stamp your way to making your very own!

Product of the Week: Forever Lovely Stamp Set
The Forever Lovely Stamp Set is a great Valentine's stamp set, but you will find yourself coming back to it over and over again.  The floral images are perfect for a celebration of love, but can be used for so many more occasions beyond.  The sentiments are equally as useful for Valentine's Day and other occasions as well.  There are a variety of sizes with the sentiments too, so you can use this set for small projects and larger ones with ease.  The large floral stamp coordinates with the foliage stamp as well, creating a perfect bouquet.  And because it is photopolymer, it is easy to align when stamping and super fun to create with!

Calling All Hosts/Hostesses!
How would you like to earn Stampin' Up! products for FREE?  I'm looking for hosts to hold private workshops and classes and now is the best time EVER.  Sale-a-Bration is in full swing, and that means more host rewards for YOU with qualified sales.  How much more?  We are talking about DOUBLE the rewards!  I'm happy to hold parties for you at my home (although I'm in Yanceyville, but have a really cool house), or we can find a location local to your home if you would rather hold your party or workshop somewhere other than a home.  And online parties and events are always fun!  And, I have special thank you's for my hosts on top of all the rewards Stampin' Up! has too!


 Lovely Wishes Card Tutorial
Forever Lovely Stamp Set


Measurements:
Base: Balmy Blue Cardstock, 8 1/2" x 5 1/2", score and fold at 4 1/4"
Layer 1: All My Love Designer Series Paper,
5 1/4" x 4"
Layer 2: Balmy Blue Cardstock,
2" x 2 1/2", use corner rounder punch from Detailed Trio to round two opposite corners
Layer 3: Whisper White Cardstock,
1 3/4" x 2 1/4", use corner rounder punch from Detailed Trio to round two opposite corners

Embellishment: Braided Linen Trim

Instructions:

1.  Stamp "Wishing You..." on Layer 3 using Tuxedo Black Memento Ink.

2.  Adhere Layer 3 to Layer 2 using Snail, making sure rounded corners line up.

3.  Wrap width of Layer 1 with Braided Linen Trim and attach ends to back side of layer 1 using Mini Glue Dots about 1 1/2" from bottom.  Tie a bow in the Braided Trim and adhere to the trim on Layer 1 using Mini Glue Dots.

4.  Adhere Layer 1 to Base using Snail.

5.  Adhere Layers 2 and 3 to Layer 1 in bottom left corner using Dimensionals.


Supplies for today's tutorial:


Sunday, January 27, 2019

Sophisticated Sunday with Lovely Lattice

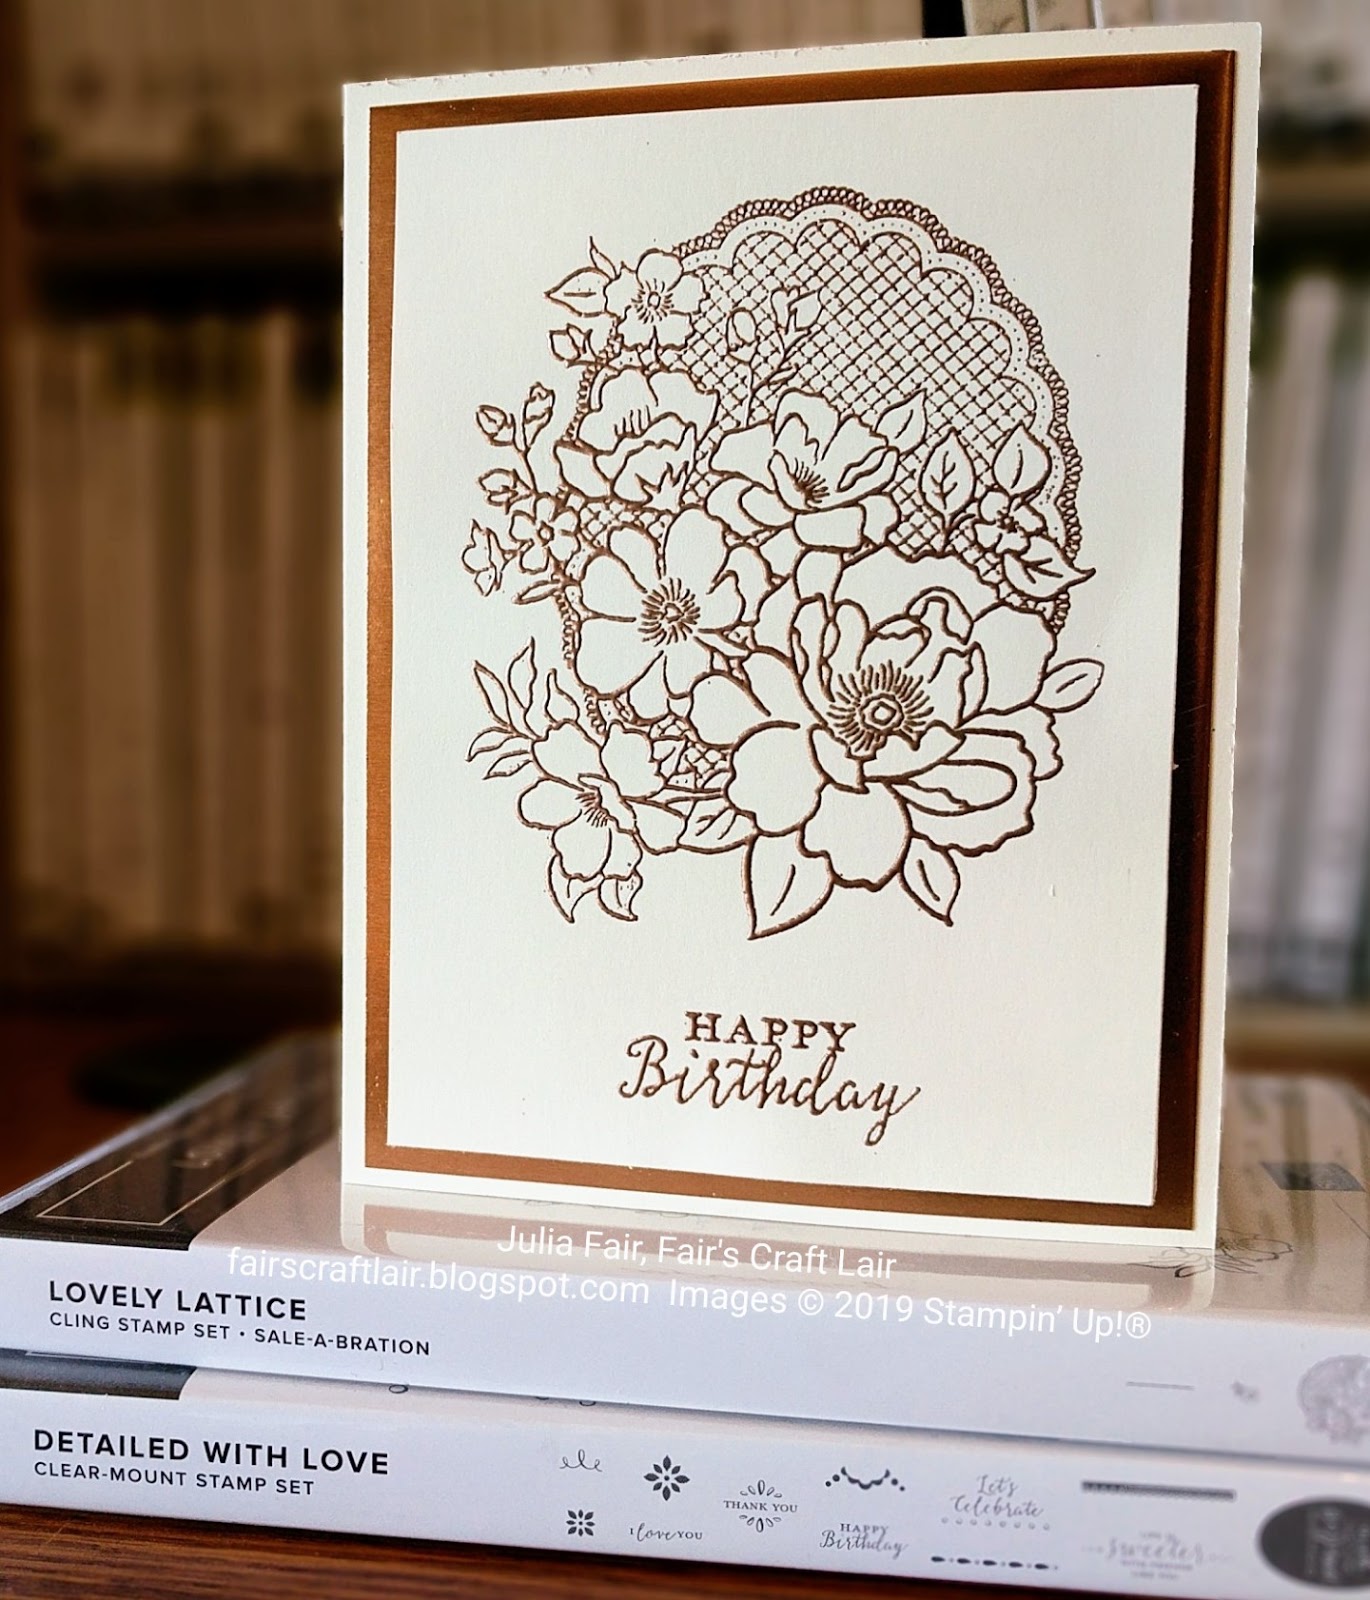
Captivating Copper Card Tutorial

So simple and stunning!  Copper Stampin' Emboss Powder and Foil Sheets with Very Vanilla.  I love metallics, and Stampin' Emboss Powders are easy to use.  Stamp with Versamark Ink, sprinkle on powder and tap off excess, then heat with the Heat Tool until it's melted together and shiny.  Stampin' Emboss Powder also comes in Silver, Gold, White and Clear, so pick your favorite and make some joy to share!  


Product of the Week
The Lovely Lattice Cling Stamp Set is perfect for designing quick and easy cards.  It features this bold, beautiful floral design on top of a lattice doily, a perfect centerpiece for many different kinds of cards.  Simply pair it with your choice of sentiment and you can create cards for any occasion.  It comes with 3 images, including the large lattice, a small floral and a border image.  You can stamp the images on solid paper, or stamp them on Whisper White and use your choice of coloring technique to add your own special flair!

How would you like to get the Lovely Lattice Stamp Set for FREE?  It's one of Stampin' Up!s Sale-a-Bration items, which means you can get it FREE with any $50 order.  Be sure to check out all the Sale-a-Bration items available.  There are so many amazing products that you can earn for free, but they will only be around for a short time.

Calling All Hosts/Hostesses!
How would you like to earn Stampin' Up! products for FREE?  I'm looking for hosts to hold private workshops and classes and now is the best time EVER.  Sale-a-Bration is in full swing, and that means more host rewards for YOU with qualified sales.  How much more?  We are talking about DOUBLE the rewards!  I'm happy to hold parties for you at my home (although I'm in Yanceyville, but have a really cool house), or we can find a location local to your home if you would rather hold your party or workshop somewhere other than a home.  And online parties and events are always fun!  And, I have special thank you's for my hosts on top of all the rewards Stampin' Up! has too!


Captivating Copper Card Tutorial
Lovely Lattice Stamp Set

Measurements:
Base: Very Vanilla Thick Cardstock, 8 1/2" x 5 1/2", score and fold at 4 1/4"
Layer 1: Copper Foil Sheet, 5 1/4" x 4"
Layer 2: Very Vanilla Cardstock, 5" x 3 3/4"

~You will need Copper Stampin' Emboss Powder and Heat Tool to make this card

Instructions:

1.  Stamp lattice centered at the top of Layer 2 in Versamark Ink.  Sprinkle Copper Stampin' Emboss Powder over image and tap off excess.  Heat emboss until powder melts together and is smooth but raised.

2.  Stamp "Happy Birthday" from Detailed With Love Stamp Set centered at the bottom below the lattice in Versamark Ink.  Emboss with Copper Stampin' Emboss Powder as done for the lattice in Step 1.

3.  Adhere Layers 1 and 2 to Base using Snail.


Supplies for today's tutorial:

Saturday, January 26, 2019

Sweet Saturday with Lovely Lattice

Variegated Lattice Card Tutorial

Multi-colored stamping?  It's easier than you think!  All you need is baby wipes, reinkers, and something to protect your surface from ink (plastic bin, or stamp case).  Place a baby wipe in or on the container to keep the ink off your work surface.  Then place dots of reinkers on the baby wipe, be sure to make them close enough so they can bleed together a bit!  Then press your desired stamp into the baby wipe and voila!  You have whatever colors you want on your stamp at the same time.  What's even better, you can use the baby wipe with ink over and over again to stamp many of the same, or even different stamps.  Just add more color if it gets too light, but be sure to add your reinkers in the same spots with the same colors as before...unless you want them to blend more!

Still not sure how to do this?  I'll be showing you how in my Facebook Live tomorrow afternoon.


Product of the Week
The Lovely Lattice Cling Stamp Set is perfect for designing quick and easy cards.  It features this bold, beautiful floral design on top of a lattice doily, a perfect centerpiece for many different kinds of cards.  Simply pair it with your choice of sentiment and you can create cards for any occasion.  It comes with 3 images, including the large lattice, a small floral and a border image.  You can stamp the images on solid paper, or stamp them on Whisper White and use your choice of coloring technique to add your own special flair!

How would you like to get the Lovely Lattice Stamp Set for FREE?  It's one of Stampin' Up!s Sale-a-Bration items, which means you can get it FREE with any $50 order.  Be sure to check out all the Sale-a-Bration items available.  There are so many amazing products that you can earn for free, but they will only be around for a short time.

Calling All Hosts/Hostesses!
How would you like to earn Stampin' Up! products for FREE?  I'm looking for hosts to hold private workshops and classes and now is the best time EVER.  Sale-a-Bration is in full swing, and that means more host rewards for YOU with qualified sales.  How much more?  We are talking about DOUBLE the rewards!  I'm happy to hold parties for you at my home (although I'm in Yanceyville, but have a really cool house), or we can find a location local to your home if you would rather hold your party or workshop somewhere other than a home.  And online parties and events are always fun!  And, I have special thank you's for my hosts on top of all the rewards Stampin' Up! has too!


Variegated Lattice Card Tutorial
Lovely Lattice Stamp Set


Measurements:
Base: Very Vanilla Note Card and Envelop

~You will need stamp case (or similar), baby wipes, and reinkers: Pacific Point and Flirty Flamingo

Instructions:

1.  Place a baby wipe in the stamp case and load with drops of reinker in both colors.  Be sure to make drops close together so you don't get white space on your stamp.

2.  Press stamp into baby wipe several times to load with ink.  You can shift the stamp around slightly to help the inks blend together on the stamp better if desired.  Then stamp onto the card Base.


Supplies for today's tutorial: